给小猫脖子上挂个照相机拍摄小猫生活DIY步骤
 | |
| CatCam | |
| News |
Since I got so many requests asking for the camera and controller, I can offer you the following:
- Modified and tested camera with build in controller
- Controller is preset to 2 minute shots but can be configured to 1 and 3 minutes
- Camera remain in original housing (keychain and viewfinder removed), controller is integrated, no wires hanging around
- You just have to plug in battery and mount the camera yourself (protective tape wrap may be sufficient for most cases).
| Introduction |
Sometimes I have some challenging ideas, or crazy like some other people would say. This time I thought about our cat who is the whole day out, returning sometimes hungry sometimes not, sometimes with traces of fights, sometimes he stay also the night out.
When he finally returns, I wonder where he was and what he did during his day. This brought me to the idea to equip the cat with a camera. The plan was to put a little camera around his neck which takes every few minutes a picture. After he is returning, the camera would show his day. First I thought about transmitting live pictures from a remote RF camera, but the equipment is too expensive and battery consumption is too high.
So the idea was born and split into these parts:
- find small, lightweight, inexpensive digital camera
- develop a controller for the camera
- protect the camera from cat attack
- mount equipment to cat
| Find camera as central part |
Best pick: VistaQuest VQ1005 Digital Keychain Camera

This camera is very attractive for unusual ideas because of its size, price and features. I checked some other small cameras but no one could compete against the VistaQuest. For only 20$ (16 Euros) you will get a small 38x60x20mm camera with 1.3M pixel resolution and a light weight of 35 Grams (without battery). The camera offers 8MB internal SRAM as well as a SD card slot were you can add up to 512MB flash memory. The camera is powered with only one AAA battery. You can strip the housing easily to gain weight or even smaller dimensions. The focus can be adjusted manually. Camera is operated with just two buttons. A small USB interface connects the camera to a PC, no drivers required (at least with XP or 2000), camera is detected as generic USB mass storage device. You can also record movies (limited to 100s) or use it as a Webcam.
A brief datasheet can be found on the VistaQuest website.
Additionally the camera supplied two other internal features which made electronical controlling easy, these are listed in the next section.
There are a few known issues:
- Viewfinder useless
- SRAM content lost if battery empty, therefore the SD card option is very beneficial
- camera "eats" batteries, no wonder because active current draw is approx. 200mA and SRAM is standby supplied (3mA).
- low performance at dark/shadow situations
- no flash
| Control Camera |
For my project the VistaQuest Digital Keychain was the camera I looked for. My goal was to control the a camera by a microcontroller to shoot pictures in a defined time sequence. The VistaQuest made it very easy for me, because it is able to supply my circuit also if switched off. This is because of an internal DC/DC converter which boosts the voltage from the 1.5V battery to 3.3V. The DC/DC converter is always working because of the internal SRAM which holds the pictures. I just had to hook the microcontroller to the internal camera supply.
Another easy thing is to operate the camera by the microcontroller. With just two buttons, internally pulled up, it was very easy to connect the uC ports. Even better, the Atmel AVR uC in-circuit programming interface could be shared so voltage supply and command signals from the camera are be plugged to the same connector.
The remaining space in the camera is large enough to carry the uC board if a smaller housing when DIP is selected (like TSOP).
To save battery capacity, I reduced the uC internal oscillator frequency to 0.5MHz. All interface pins are switched to the lowest power consumptive state during standby. Additionally, the camera is only switched on for taking pictures (highest power saving potential).
Special considerations: it has to be observed that the battery connectors are holding the battery securely during mechanical shock situations. Power loss during Flash write operations may cause damage to the SD card. See additional improvements.
To protect the microcontroller from being damaged because of slowly falling supply power (battery drain) a brown-out protection feature has to be activated.

Signals to control the camera and supply external electronics can be found on the circuit: O=On/off (low active), M=Ground, P=3.3V supply.

Trigger/Shutter signal can be found on the second circuit board at the switch terminal T (low active).

The picture shows the circuit for the microcontroller board based on an Attiny2313. Later on I switched to an Attiny13 (only 8 pins). You can see that the interface is used for both programming and controlling.

The picture shows the microcontroller board which plugs to the camera and controls it.

Located on the reverse side of the control board is the connector to plug onto the camera and also used to program the microcontroller.

Here you can see the controller circuit plugged to the camera. The green connector fits to the programming interface of the uC board.
Basic operation sequence:
- uC timer interrupt increases time counter
- if time counter matches the adjusted delay time, the camera is switched on
- picture is taken
- camera switched off
- uC pin configuration is set to a state with lowest power consumption
- time counter set to zero.
Additional improvements:
I realized soon that using a standard AAA battery limits the useful operation time very much. A operation time of 8 hours could be covered, making each 2.5 minutes one photo. Also the reliability of the battery connection was weak. Therefore I decided to switch over to a 1.2V AA rechargeable NiMh battery with 2.5Ah. I removed the battery connection from the camera board and gained space for the larger AA cell. I soldered wires to the battery terminals (carefully ! Avoid to boil the electrolyte) and to the board. The result was amazing. One charge cycle provided more than 48 hours of operation with a trigger sequence of 1 Minute ! Fortunately the protective housing was large enough to carry the new battery.
It turned out that the cat covered often the lens when lying around. So I simply put the camera top down in the housing. This required a new window hole but provided much better photos. Needless to say that the window has to be extra water tight. Another positive effect: The battery was now on the top, much easier access and much better balanced.
| Protect Camera |
Well, I thought the hardest part is done by developing the software and soldering the controller board. But it is more the housing to protect the camera. You can not imagine what kind of requirements have to be fulfilled if you want to equip your cat with a camera. I built a small housing out of plastic plates and put it on the collar of the cat for evaluation purpose. This housing was last seen as the cat walked out of the door... Probably the wires I used for attaching were not strong enough. Or someone released the cat from the interesting looking piece.
For the second try I used the plastic package of a child toy (Kinderueberraschung), put a stone in it for loading it with some weight and attached it again to the cat collar. This time the part returned - dirty and scratched outside, water inside. What the hell is the cat doing !? This raised the requirements for the camera protective housing a lot:
- Shock resistant - cat jumps from tree, housing hit ground
- Scratch resistant - Cat cleans itself with claws or sneaks above the ground
- Water resistant - If cat drinks, the piece around their neck will hang into water
- Theft resistant - If equipment draws attention cat will loose it, especially if it is easily removable.

The final result for the protective housing. Upper side is closed with a piece of plastic which is attached by some tape. I made the housing out of a flat plastic lid which I cutted into pieces. The material was PP (Polypropylen) which is kind of soft but unfortunately not glueable with standard plastic or epoxyd glue. So I used hot glue which sticks good on PP. The whole housing is water thight, the lens is covered with a thin and clear PMMA plastic sheet.
| Mount Equipment |
Big moment no. 1: attach the collar with the camera to the cat. The reaction was not very happy but finally accepted. Reality check passed :-)

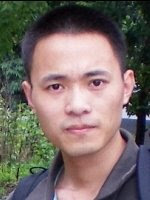
Well, here you can see Mr. Lee with his observation camera.
Big moment no. 2: Cat returns with cargo. Could hardly wait until the collar was removed, housing opened, SD card plugged into computer to see how everything worked.
| Pictures |
And here are the photos of his trips: Mr. Lees Trip 1 -> Mr. Lees Trip 2 -> Mr. Lees Trip 3 -> Mr. Lees Trip 4
--
最新奇有趣的新技术、科幻、社会学信息:
http://www.qixianglu.cn
forcode科幻小说《抽水马桶的秘密》:
http://www.cmfu.com/showbook.asp?Bl_id=60008
标签: 有趣的东西

 手机阅读
手机阅读
0 条评论:
发表评论
订阅 博文评论 [Atom]
<< 主页
============================================================
格兰仕微波炉报价单 英语六级历年真题听力下载 大陆身份证生成器
東方神起的所有反轉劇!!.[含东方剧场](會繼續更新以後的)(已可覲看)
电视剧《靠近你温暖我》全集下载(BT/迅雷/电驴/剧照)
精彩的洞庭湖人鼠大战(4视频+forcode点评)
一百多个电影字幕下载网站,精心收集整理!
(视频)(CCTV10“走进科学”-科幻之旅专题-克隆人 8.14)
国外BT站点和BT种子搜索站(国外完整bt搜索列表)
============================================================
forcode科幻小说《抽水马桶的秘密》正在起点中文网连载
《抽水马桶的秘密》读者评论:
(1)你的书很好看,比大刘,王晋康的创意好太多了,努力吧将来出实体书我一定会买的。(2)很有想象力的作者啊!!估计是看了不少科幻小说的人,希望不要浪费你非凡的想象力。 (3) 读者在自己博客或论坛对《抽水马桶的秘密》的评论。(4)点击此处查看全部的读者评论(18页,1000条以上)。
《抽水马桶的秘密》相关帖子:
《远程面包机》提纲|| 《进化论危机》提纲大家一起来设计
抽水马桶是外星人的试管|| 读者推荐超一万票
《抽水马桶的秘密》内容简介:
地球哺乳界正在发生的一次大规模跨物种升级,DNA机制并非人们所想像的那样是决定生命的最终遗传载体,而是类似浏览器这样的转译机制,真正的遗传物质存储在弥漫整个宇宙的光子数据库中,DNA机制实际上是一种设定了进化路径的文明压缩包的解压机制,数十亿年前灭绝的三栖人发明了光子数据库和DNA机制,目的是为了让这个机制最终复活三栖人文明,而人类(裸猿)这一物种在三栖人社会里其实是一种宠物,但是DNA机制似乎出现了点问题,或者说不知道什么原因裸猿突然变得太过聪明了,在播撒了始祖菌(DNA种子)的所有星球,进化路径发展到裸猿阶段,并没有继续演化出最后一步:三栖人,而强大的光子数据库一旦意识到DNA进化机制的这个漏洞,立刻关闭了这些星球对光子数据库的访问权限,这样,这些星球的生态系统都面临着灭绝的危险,因为他们脱离了光子数据库的遗传支持再也无法自然繁殖,只能靠遗传工程来复制现有的基因,或者做些小打小闹的修改,整个宇宙各星球上的基于DNA机制的生态系统都面临崩溃的危险。最终在13世纪,裸猿一族在银河边缘一个不起眼的小星系发现了地球这个由于某种原因至今还刚进化到裸猿初级阶段的星球,为了催熟地球的进化速度,外星裸猿文明开始介入地球的发展,为了防止光子数据库察觉到非地球文明的介入并关闭地球的权限,这种介入始终是暗中进行,因为介入方式的分歧,银河系裸猿文明分裂为两大集团,这两大集团的争斗伴随着人类近现代的发展,于是,文艺复兴开始了、三次科技革命出现了、两次世界大战也来了,直到今天,地球人类为自己的技术进步而沾沾自喜,丝毫不知道技术迅速发展的真正原因以及潜藏的危机。
============================================================
forcode2003年以前的习作:未来的婚姻、远程面包机
forcode朗诵《蜀道难》||forcode的一百多个科幻构思
奇想录:最新奇有趣的新技术和新闻点评|| 订阅“奇想录”